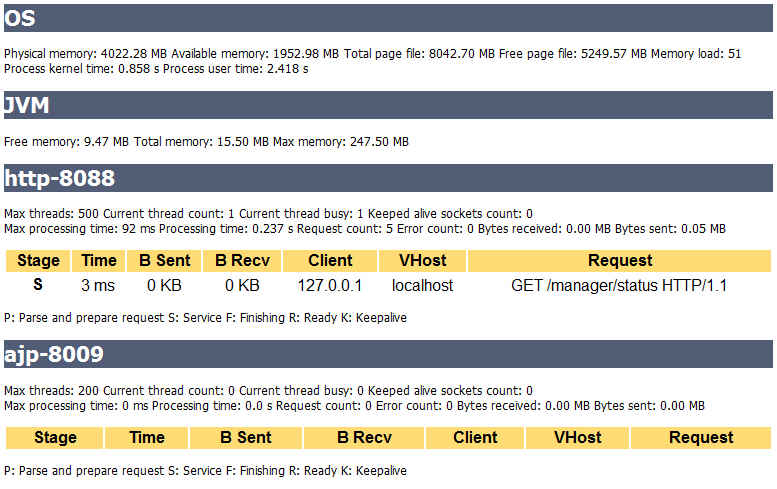
Tomcat是一個不錯的Java Web Appaction,本身也有提供監控執行的東東,雖然陽春,但對於系統效能調校,這些數據是非常有用的。
1.首先,預設這個監控是沒有開啟的,要打開Tomcat的status頁面,要先至Tomcat的conf目錄下的tomcat-users.xml裡面增加使用者資料及權限,調整如下:
<tomcat-users>
<role rolename=”manager”/>
<user username=”youradmin” password=”yourpassword” roles=”manager”/>
</tomcat-users>
這裡的password和username請自行修改,之後重啟tomcat,連結至http://localhost:8080/manager/status再輸入其帳號密碼即可看到現行運行的status(畫面如下)
 如果你是要拿這些數據去做一些統計分析圖表,可執行http://localhost:8080/manager/status?XML=true 這樣即可以XML的方式產出(下方參考連結中有一個是在教如何用其它工具做圖表,有興趣請自行延伸閱讀)
當然,這個status頁面所提供的數據是做何用的,我想有些人看到這麼多數據就很頭大,所以以下是參考別人的網站再轉譯,應該有所幫助:
- ThreadInfo: Tomcat中執行序資訊
- Max threads: 執行序最大可以產生的數量
- MinSpareThreads: 執行序最小空閒的數量
- MaxSpareThreads: 執行序最大空閒的數量
- Current thread count: 現行執行中的Thread數量
- Current thread busy: 現行處於busy狀態的執行序數
- RequestInfo: 請求的統計資訊
- Max processing time: 單一個請求的最大處理時間
- Processing time: 請求的處理時間
- Bytes received: 收到的Bytes數
- Bytes sent: 發送的Bytes數
- Request count: 總請求數
- Error count: 發生錯誤的請求數
- Stage Time B Sent B Recv Client VHost Request
- 這些就是你訪問伺服器這個時間點,伺服器正在處理的連接的一些資訊。
- ThreadInfo: Tomcat中執行序資訊 Max threads: 執行序最大可以產生的數量 MinSpareThreads: 執行序最小空閒的數量 MaxSpareThreads: 執行序最大空閒的數量 Current thread count: 現行執行中的Thread數量 Current thread busy: 現行處於busy狀態的執行序數
- RequestInfo: 請求的統計資訊 Max processing time: 單一個請求的最大處理時間 Processing time: 請求的處理時間 Bytes received: 收到的Bytes數 Bytes sent: 發送的Bytes數 Request count: 總請求數 Error count: 發生錯誤的請求數
- Stage Time B Sent B Recv Client VHost Request 這些就是你訪問伺服器這個時間點,伺服器正在處理的連接的一些資訊。
參考資料:
http://www.javaeye.com/problems/36777
http://bbs.51testing.com/thread-113013-1-1.html(有人透過在Linux透過其它製圖工具繪製Tomcat Status圖表,有興趣可參考此連結)
相信絕大部份的程式設計師,內心都會有一個小小的願望,就是自己寫的系統可以給很多人使用,當系統愈有名氣時,自己就愈高興,不過或許這也是另一個考驗的開始…..
當多人使用系統時,除了程式要寫的好之外,系統的硬體等級、應用系統伺服器的調校、資料庫參數的調校等當然還有頻寬的限制等,都是會影響你系統運行時的品質,上述要點,一個出了問題,就算你其它的設定再好,也沒啥鳥用,但當都一一調整後,你的系統還是出現負擔過重時,在有限的資源無法擴充之下,就只能吹毛求疵從各項再去下手。本次要和大家介紹的網站設定GZIP壓縮設定,就是一般常會忘了可以這樣設定,並且這樣的設定可以大幅改善頻寬的使用,經小弟的測試,一般一個圖文並貌的網站,總共約可以減少至少一半以上的大小,這樣你頻寬瞬間可以大幅度支援更多使用者,就讓我快點告訴大家這個好用的設定吧。
先說明一下什麼是網頁GZIP壓縮設定,因為目前網頁都是以原始碼的模式進行傳遞,再藉由瀏覽器去直譯產出你看到的網頁,所以當你看到網頁原始碼時,都是一些如何呈現的語法,如果我們先將網頁原始碼壓縮後再傳輸,到了瀏覽者的電腦上再解開,這樣就可以簡省很多傳輸的頻寬。而網頁原始碼這種純文字格式的檔案,壓縮起來非常有成就感,因為裡面太多空白及相同的字眼,所以一般壓起來,都可以壓縮到只剩下十之一以下的容量,這樣就能快速傳送網頁資訊。
目前有支援GZIP的瀏覽器非常眾多,包含IE、Firefox、chrome等目前市佔率極高的瀏覽器都有支援,所以等於九成以上的瀏覽者都可以適用,這次我們就來說說JAVA WEB APPLICATION Tomcat如何設定 GZIP壓縮傳輸設定,首先我們開啟Tomcat/conf/server.xml,找尋以下設定
<Connector port=”8080″ maxHttpHeaderSize=”8192″
maxThreads=”150″ minSpareThreads=”25″ maxSpareThreads=”75″
enableLookups=”false” redirectPort=”8443″ acceptCount=”100″
connectionTimeout=”20000″
disableUploadTimeout=”true” />
這主要是設定Tomcat系統在運行時的一些參數,包含監聽的Port、同時最大接受的request等,其實還有很多參數可以設定,當然包含了GZIP的壓縮設定,所以我們可以在此加上以下參數
compression=”on”
是否啟用壓縮機制
compressionMinSize=”2048″
設定壓縮檔案最小的size,單位是Bytes,所以預設值為2K,這裡的意思是當檔案超過2K時才會進行壓縮
noCompressionUserAgents=”gozilla, traviata”
設定不支援的瀏覽器就不使用壓縮
compressableMimeType=”text/html,text/xml”
設定要壓縮的contextType為何,除了html及xml之外,還可以多設定一些也是原始碼的檔案例如text/css,text/javascript等,讓css及javascript的檔案也能壓縮傳輸,至於一些圖檔及已經壓縮過的檔案建議不要設進來,因為圖檔一般都已經有壓縮過了,如果將一些壓縮過的檔案再壓,除了浪費時間外,搞不好檔案還會愈壓愈大喔
所以我們就趕快設定看看是否有改善,加入上述壓縮的設定後,參數如下:
<Connector port=”8080″ maxHttpHeaderSize=”8192″
maxThreads=”150″ minSpareThreads=”25″ maxSpareThreads=”75″
enableLookups=”false” redirectPort=”8443″ acceptCount=”100″
disableUploadTimeout=”true”
connectionTimeout=”20000″
compression=”on”
compressionMinSize=”2048″
noCompressionUserAgents=”gozilla, traviata”
compressableMimeType=”text/html,text/xml”/>
除了Tomcat可以這樣設定外,如果你有使用Apach也可以很容易設定GZIP壓縮設定,如果有興趣,請去找孤狗大師問問題吧!!
最近幫客戶系統製作安裝光碟時,在安裝Tomcat發現如果不是使用Tomcat官網下載的exe安裝檔案,透過Tomcat\bin 下的service 進行服務安裝時,裝好的服務預設啟動模式為手動
找了一下資料,發現有二種解法
1.直接從service.bat 下手,請用編輯器打開 找尋 「 :installed 」在這執行腳本中的
“%EXECUTABLE%” //US//%SERVICE_NAME% ++JvmOptions “-Djava.io.tmpdir=%CATALINA_BASE%\temp;-Djava.util.logging.manager=org.apache.juli.ClassLoaderLogManager;-Djava.util.logging.config.file=%CATALINA_BASE%\conf\logging.properties” –JvmMs 256 –JvmMx 512
加上 –Startup=auto ,結果如下:
“%EXECUTABLE%” //US//%SERVICE_NAME% ++JvmOptions “-Djava.io.tmpdir=%CATALINA_BASE%\temp;-Djava.util.logging.manager=org.apache.juli.ClassLoaderLogManager;-Djava.util.logging.config.file=%CATALINA_BASE%\conf\logging.properties” –JvmMs 256 –JvmMx 512 –Startup=auto
這樣執行service install tomcat5 後就預設啟動模式為自動啦
2.第二個方法,是透過window的指令下手,請執行
sc config service_name start=auto
這樣也行,所以可以把這指令寫在安裝步驟也可以達到預期效果
以上執行在搭配Tomcat 5.5 測試過~是ok的!!
如果要調整安裝在Windows 上Tomcat服務的參數可以在console mode執行以下指令即可進行更改啟動參數
C:\> tomcat6 //US//Tomcat6 –Description=”Apache Tomcat Server – http://tomcat.apache.org/ ” \
C:\> –Startup=auto –Classpath=%JAVA_HOME%\lib\tools.jar;%CATALINA_HOME%\bin\bootstrap.jar \
C:\> –JvmMx=512
重點在於使用 //US// (Update service parameters) 指令進行更新參數作業,可使用詳細參數如下:
| ParameterName |
Default |
Description |
| –Description |
|
Service name description (maximum 1024 characters) |
| –DisplayName |
ServiceName |
Service display name |
| –Install |
procrun.exe //RS//ServiceName |
Install image |
| –Startup |
manual |
Service startup mode can be either auto or manual |
| –DependsOn |
|
List of services that this service depend on. Dependent services are separated using either # or ; characters |
| –Environment |
|
List of environment variables that will be provided to the service in the form key=value. They are separated using either # or ; characters |
| –User |
|
User account used for running executable. It is used only for StartMode java or exe and enables running applications as service under account without LogonAsService privilege. |
| –Password |
|
Password for user account set by –User parameter |
| –JavaHome |
JAVA_HOME |
Set a different JAVA_HOME then defined by JAVA_HOME environment variable |
| –Jvm |
auto |
Use either auto or specify the full path to the jvm.dll. You can use the environment variable expansion here. |
| –JvmOptions |
-Xrs |
List of options in the form of -D or -X that will be passed to the JVM. The options are separated using either # or ; characters. |
| –Classpath |
|
Set the Java classpath |
| –JvmMs |
|
Initial memory pool size in MB |
| –JvmMx |
|
Maximum memory pool size in MB |
| –JvmSs |
|
Thread stack size in KB |
| –StartImage |
|
Executable that will be run. |
| –StartPath |
|
Working path for the start image executable. |
| –StartClass |
|
Class that will be used for startup. |
| –StartParams |
|
List of parameters that will be passed to either StartImage or StartClass. Parameters are separated using either # or ; character. |
| –StartMethod |
Main |
Method name if differs then main |
| –StartMode |
executable |
Can one of jvm java or exe |
| –StopImage |
|
Executable that will be run on Stop service signal. |
| –StopPath |
|
Working path for the stop image executable. |
| –StopClass |
|
Class that will be used on Stop service signal. |
| –StopParams |
|
List of parameters that will be passed to either StopImage or StopClass. Parameters are separated using either # or ; character. |
| –StopMethod |
Main |
Method name if differs then main |
| –StopMode |
executable |
Can one of jvm java or exe |
| –StopTimeout |
No Timeout |
Defines the timeout in seconds that procrun waits for service to exit gracefully. |
| –LogPath |
working path |
Defines the path for logging |
| –LogPrefix |
jakarta_service |
Defines the service log filename |
| –LogLevel |
INFO |
Defines the logging level and can be either error, info, warn or debug |
| –StdOutput |
|
Redirected stdout filename |
| –StdError |
|
Redirected stderr filename |
請依版本參考相關文件:
http://tomcat.apache.org/tomcat-5.5-doc/windows-service-howto.html
http://tomcat.apache.org/tomcat-6.0-doc/windows-service-howto.html
 如果你是要拿這些數據去做一些統計分析圖表,可執行http://localhost:8080/manager/status?XML=true 這樣即可以XML的方式產出(下方參考連結中有一個是在教如何用其它工具做圖表,有興趣請自行延伸閱讀)

近期留言